Getting started
The step-by-step process for building a mapping and workflow, illustrated using an OpenMRS patient mapped to a FHIR® IPS Patient Profile and sent to a shared health record (FHIR® server). For an overview of Segora’s capabilities and scope, see Features.
Your integration journey
From structures to a live integration
-
01
Prepare
The source and the target, side by side.
-
02
Design and test
Repeat until it’s right
-
03
Go live and share
Documentation as you workEvery save brings the workflow’s specification up to date.
Change with confidenceCome back to designing whenever a system changes. History keeps earlier versions to restore.
The words used here
- Mapping
- How data in one structure becomes data in another: field links, code mappings and required values.
- Source
- The system that sends the message, using one mapping.
- Target
- A system Segora delivers to, such as a FHIR® server or your interoperability layer.
- Workflow
- The route a source’s message takes. Its primary path decides the answer the source gets back.
- Orchestration
- A side branch that sends the message, or a system’s response, on to another system without changing the answer the source gets.
- Pipeline
- A set of systems built once and shared by several workflows. Optional.
- Segora mediator
- After a target: checks that system’s response with rules, can convert it, and passes it on in order. Optional.
- Endpoint
- The workflow’s web address that the sending system calls, with an API key.
-
1Load the structures
Create a project, then a mapping: this is where you build your mapping rules. A mapping has two structures: the source structure (what the sending system sends) and the target structure (what the receiving system expects).
- Choose the structure type for each: Legacy, FHIR® (R4 or R5) or OpenMRS.
- Load each structure, in one of three ways:
- From an address: a FHIR® profile, a base FHIR® resource, or any other published structure.
For a FHIR® profile, use the address of its web page in the implementation guide (the
.htmlpage), not its canonical URL. Segora reads what it needs from that page. For the IPS Patient:Use
https://hl7.org/fhir/uv/ips/StructureDefinition-Patient-uv-ips.htmlNot
http://hl7.org/fhir/uv/ips/StructureDefinition/Patient-uv-ips - From a file: a JSON or XML sample of the message.
- With AI: describe your use case, and Segora suggests the FHIR® or OpenMRS structures; you load the one you choose.
- From an address: a FHIR® profile, a base FHIR® resource, or any other published structure.
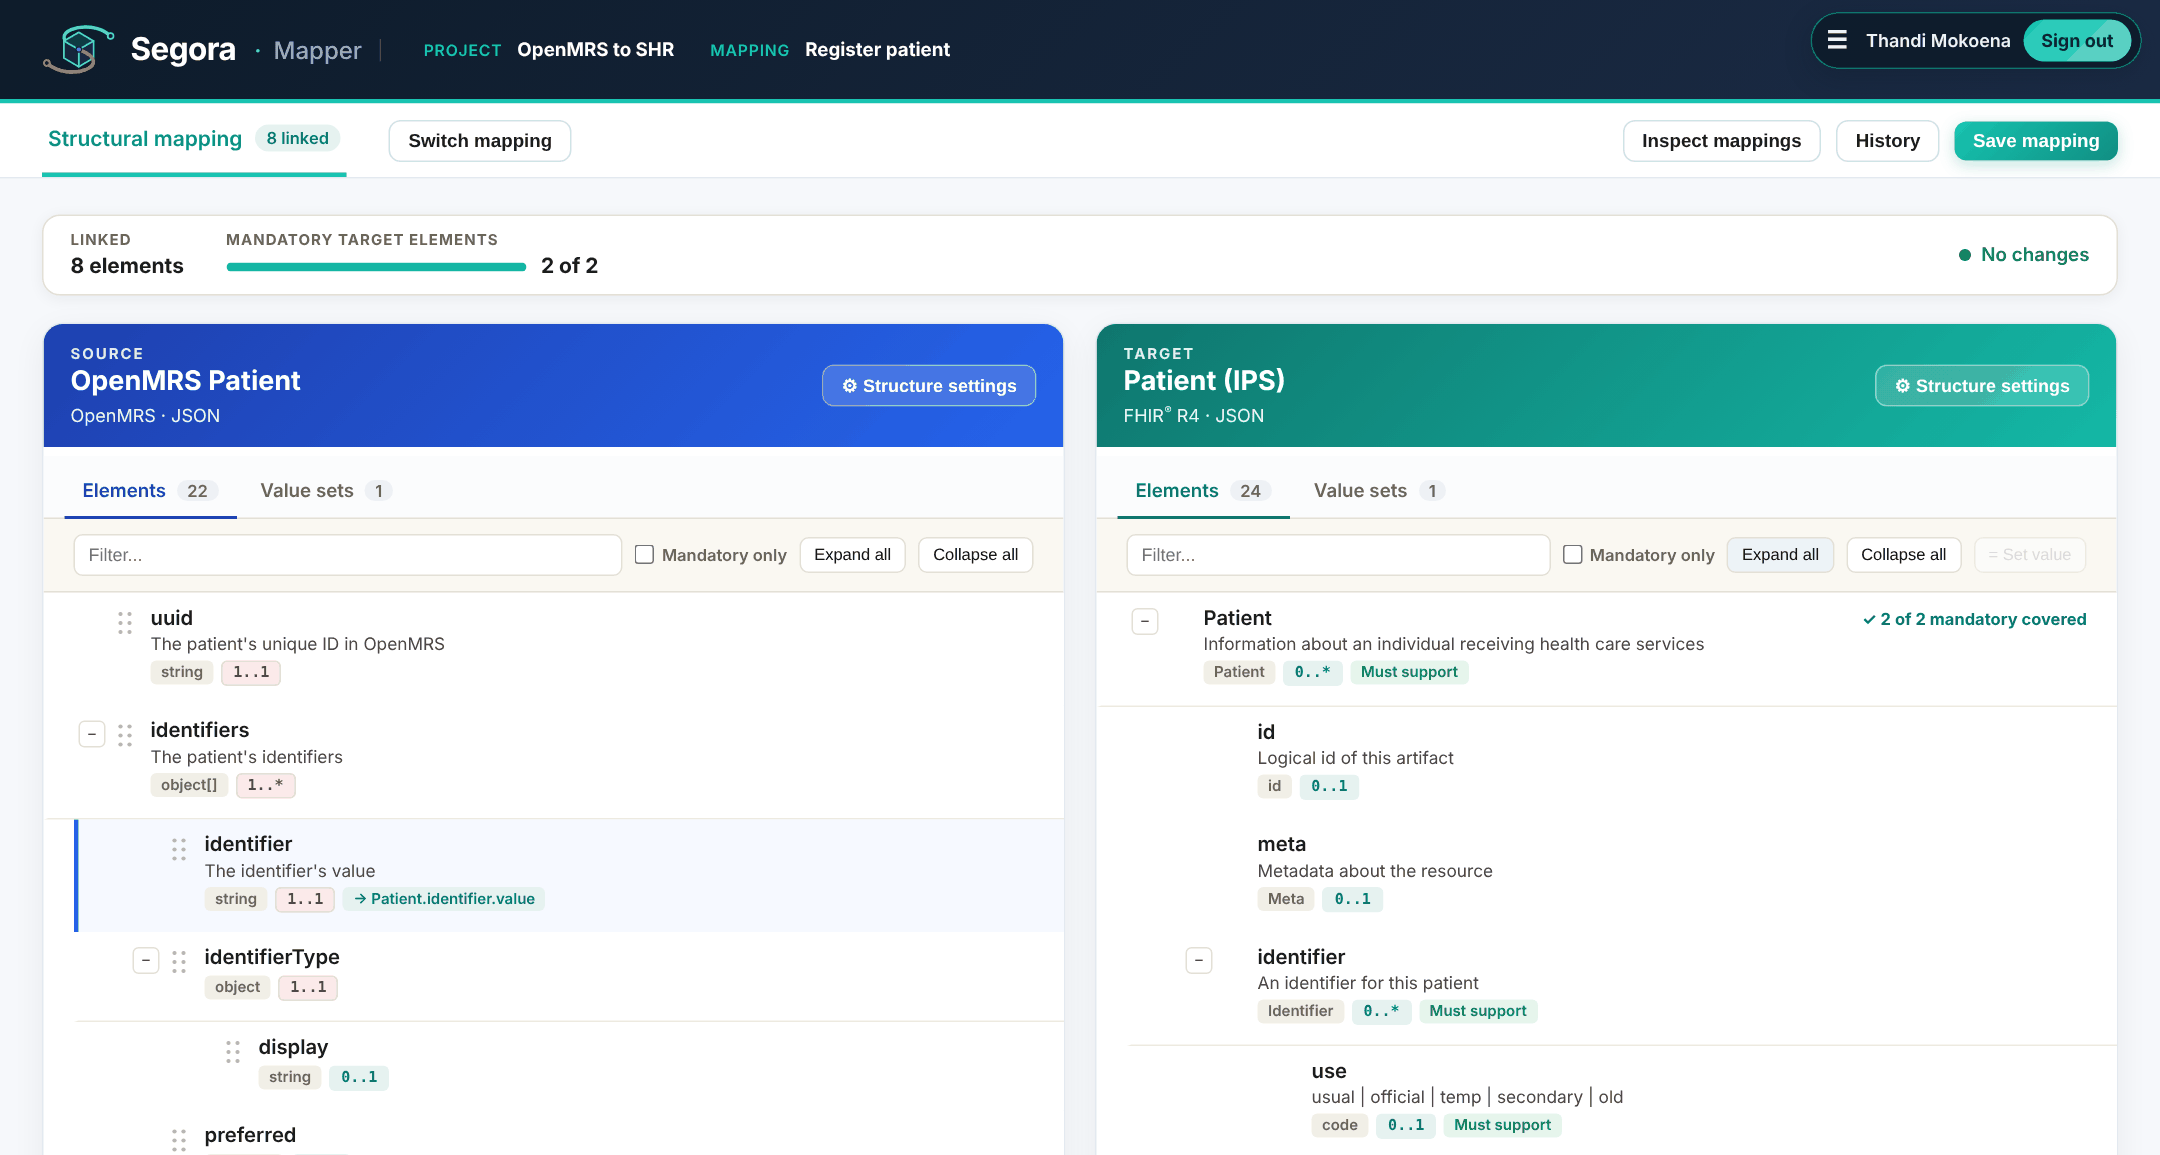
An OpenMRS patient (left) and the IPS Patient profile (right), loaded side by side. -
2Value sets: get them, attach them, map their codes
Coded values rarely match between systems: one sends
M, the other expectsmale. Value sets carry those codes.For FHIR® and OpenMRS structures, Segora gets the value sets for you and attaches each one to its element:- FHIR®: the value sets the profile uses, such as AdministrativeGender for
gender. - OpenMRS: the coded lists from your OpenMRS server, such as gender or identifier types.
For anything else, usually a legacy system:
- Get the template: download the value set template and fill it with the system’s codes.
- Load it on the source or target side: upload the filled-in template, or enter its web address if you have published it online.
- Attach it: drag the value set onto the element it belongs to.
- Map the codes: drag each source code onto its target code.
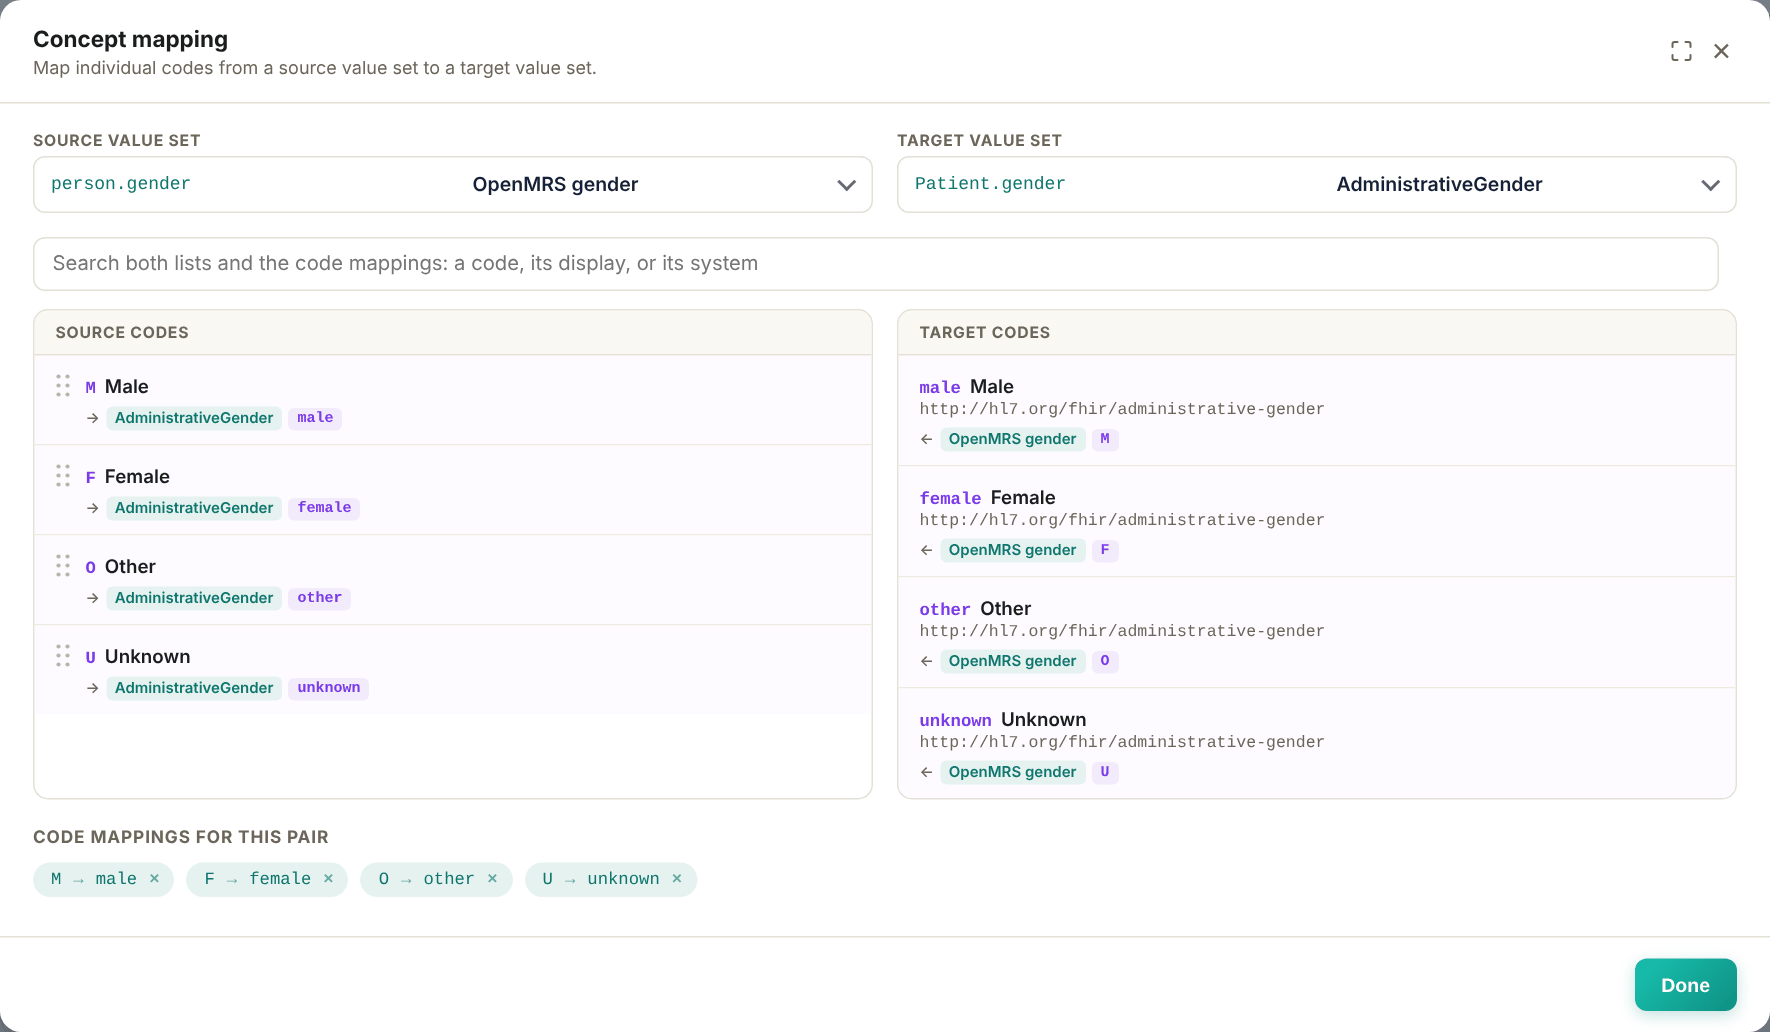
OpenMRS gender codes M, F, O and U mapped to FHIR®’s male, female, other and unknown. - FHIR®: the value sets the profile uses, such as AdministrativeGender for
-
3Map the elements
Drag each source element onto its target element. AI can suggest links; nothing is linked until you accept it. Every link and value set is listed below the two structures.
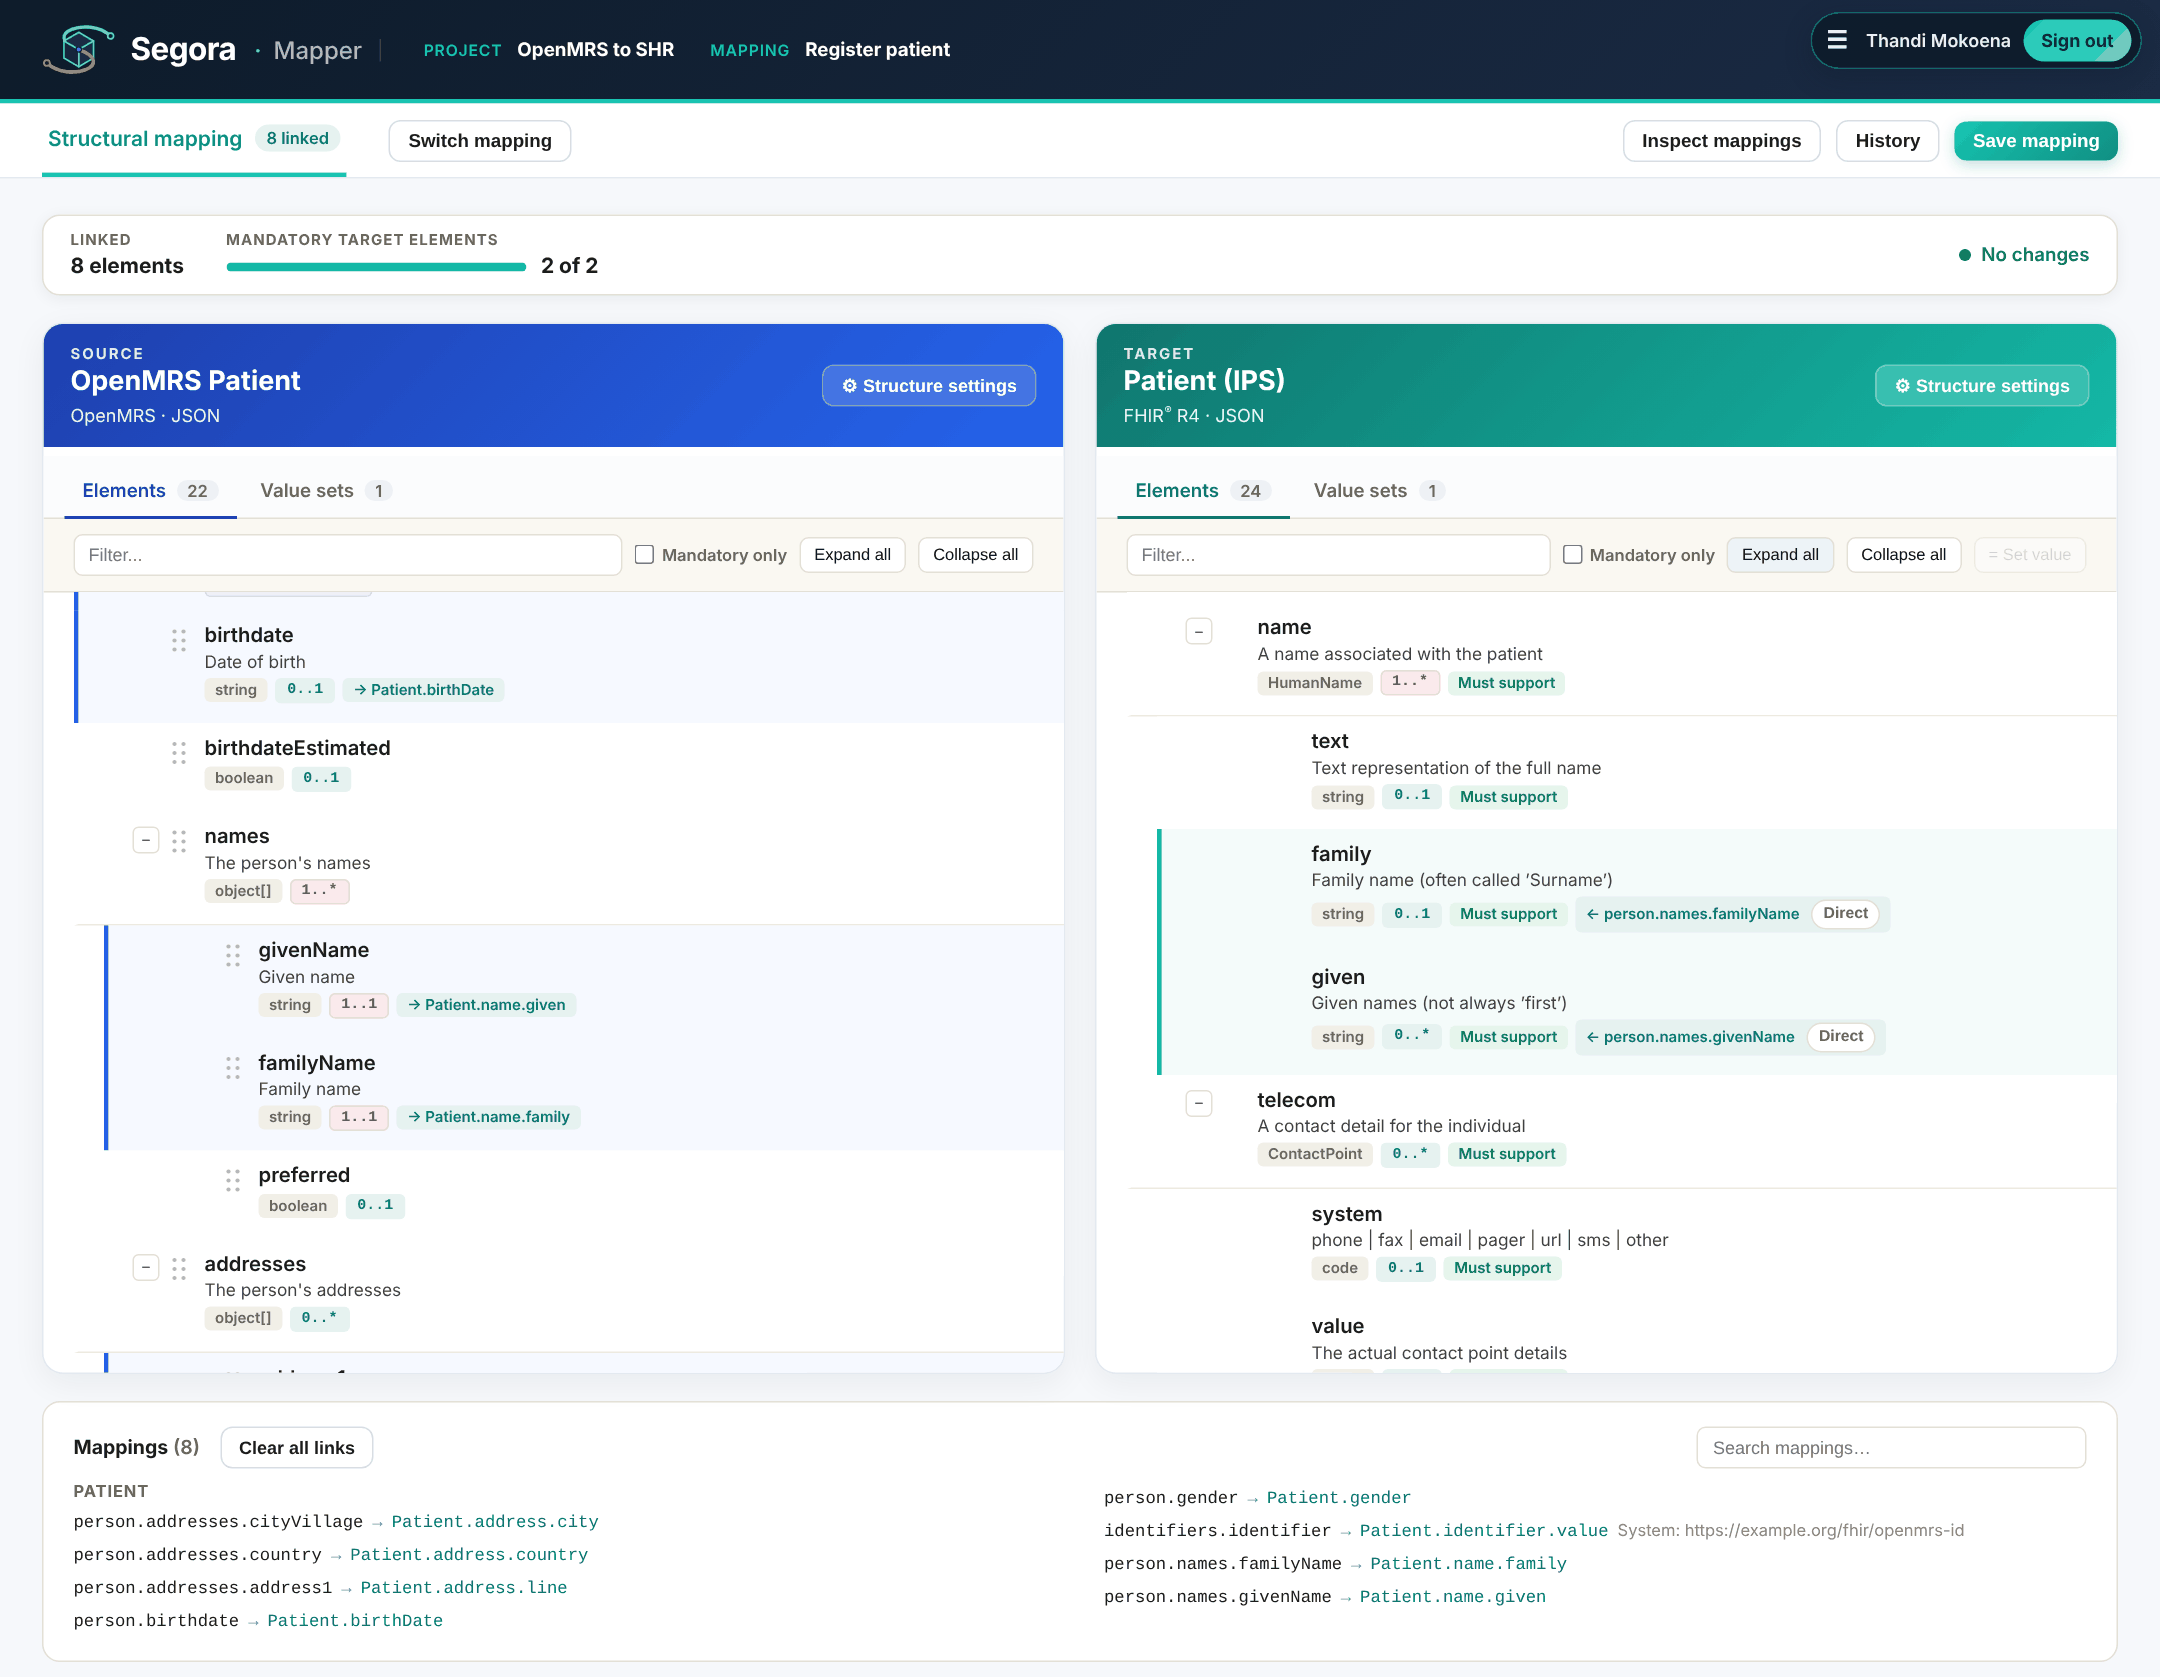
OpenMRS givenNameandfamilyNamelinked to IPSname.givenandname.family, with every link listed below. -
4Inspect: check it before anything is sent
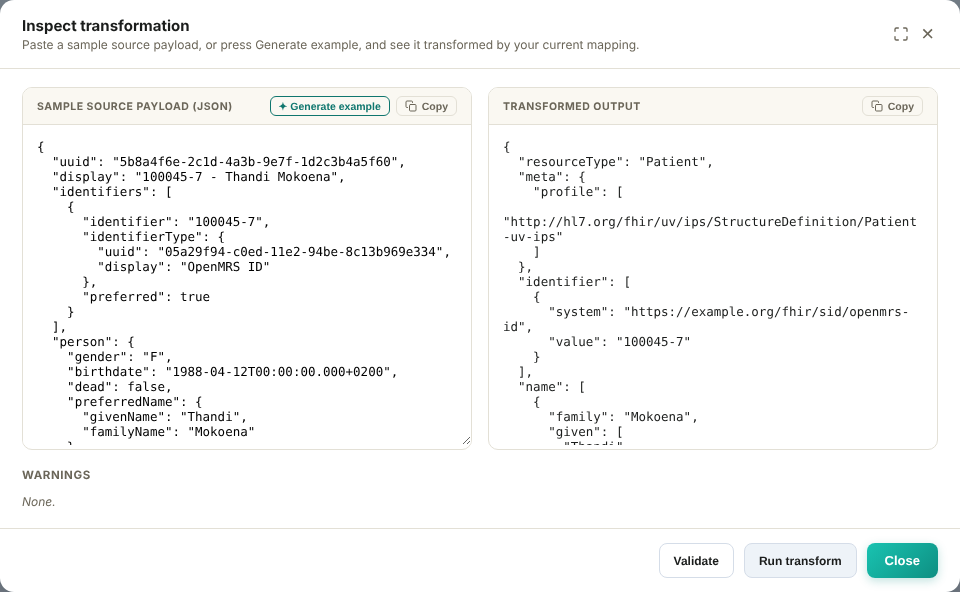
Paste a sample of the source message, or generate one, and see exactly what Segora would send. For a FHIR® target, validate the result against its profile. Fix the mapping and inspect again until it is right. Inspecting is free and never counted as a transaction.
-
5Design the workflow
A workflow defines where a mapped message goes.
Add the mapping as the source system, add the target system it sends the message to, and connect them. Segora checks that the target responds.
From there, you can connect another target to create a chain, where each system passes its response to the next, or send that response to another system on the side through an orchestration.
The response from the final system on the primary path is returned to the original source.
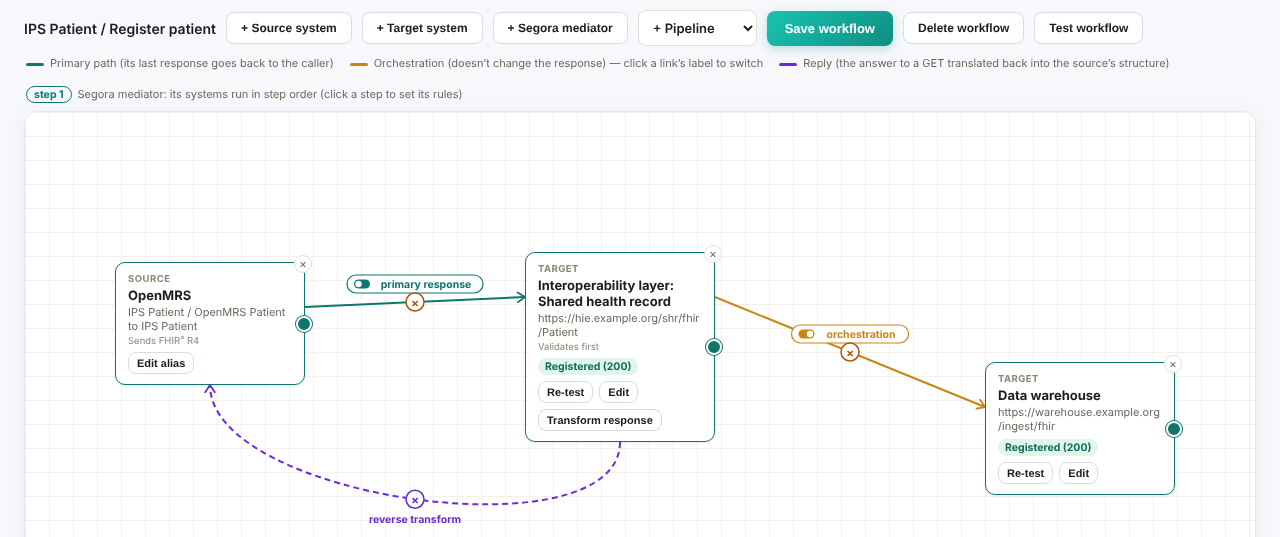
The full workflow: OpenMRS sends to one target, “Interoperability layer: Shared health record”, the address of the layer’s shared health record endpoint. It validates first, and the shared health record’s answer, passed back by the layer, goes back to OpenMRS. That answer also goes on to a data warehouse through an orchestration, without changing what OpenMRS gets. For a GET, the purple reverse transform turns the shared health record’s answer back into OpenMRS’s own structure, using the same mapping in reverse. For a FHIR® server, enable Validate before sending. Segora submits each message to the server’s
$validateoperation first. Only messages that pass validation are sent to the target. Here, the shared health record implements IPS, so it checks each Patient against the IPS Patient profile.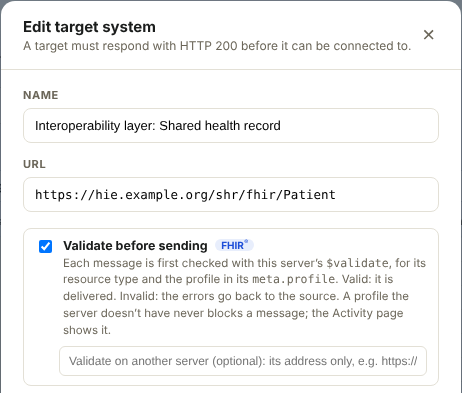
In the target’s settings. What happens behind that target Segora calls one endpoint. What the interoperability layer does next is the implementers’ own configuration: here its shared health record mediator asks the client registry for the patient’s business identifiers (1, 2), then sends the POST or GET to the shared health record, a FHIR® server implementing IPS, with those identifiers (3). The answer comes back through the layer and Segora to OpenMRS (4). Each endpoint the layer offers is its own target in Segora, such as “Interoperability layer: Client registry”.
SAfter a system answers: the Segora mediator
OptionalA Segora mediator comes after a target system, such as your interoperability layer. It takes that system’s answer, checks it and passes it on to further systems, one after the other: step 1, step 2 and so on, with no code. Step 1 gets the answer of the system before the mediator; each later step gets the answer of the step before it.
Rules decide whether a step runs. Each rule names a data element in that answer, an operator (equals, greater than, contains, is empty, is not empty…) and a value, and a step runs when all or any of its rules are true. If they are not, the run stops there and says which rule was not met. A step can also transform the answer with one of the project’s mappings before sending it, for example from a FHIR® R4 Patient to an R5 Patient for an R5 server. A step can also be another Segora mediator.
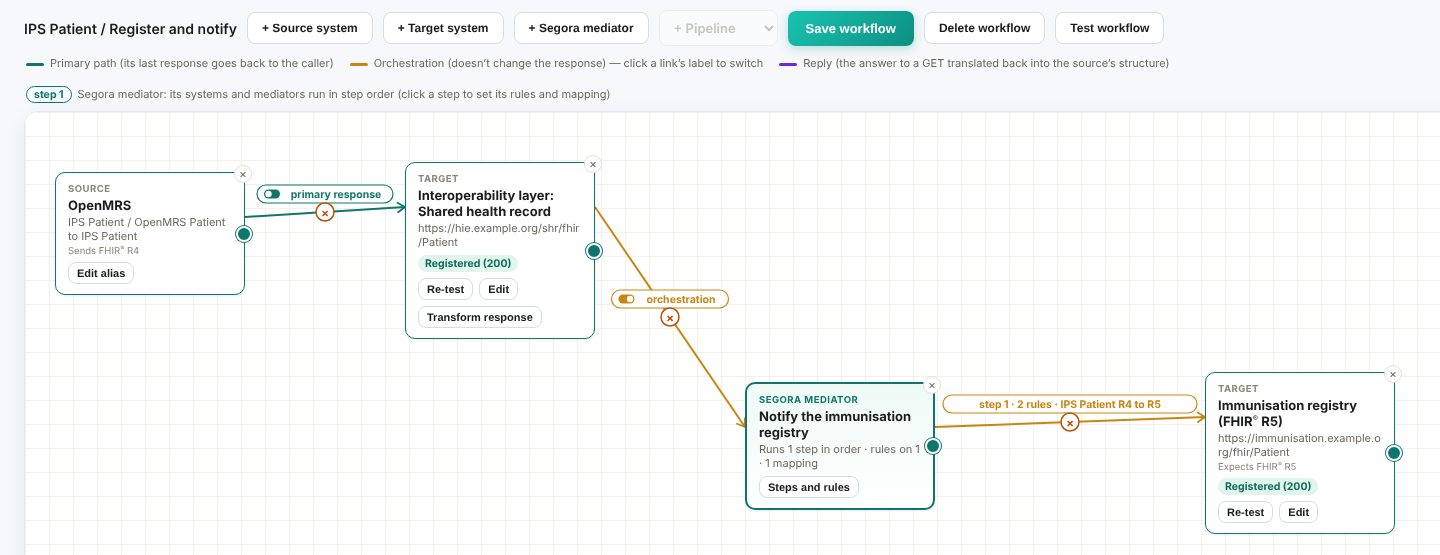
OpenMRS registers the patient through the interoperability layer. The mediator gets the layer’s answer and, when its rules are true, sends it on to the immunisation registry, transformed from R4 to R5. 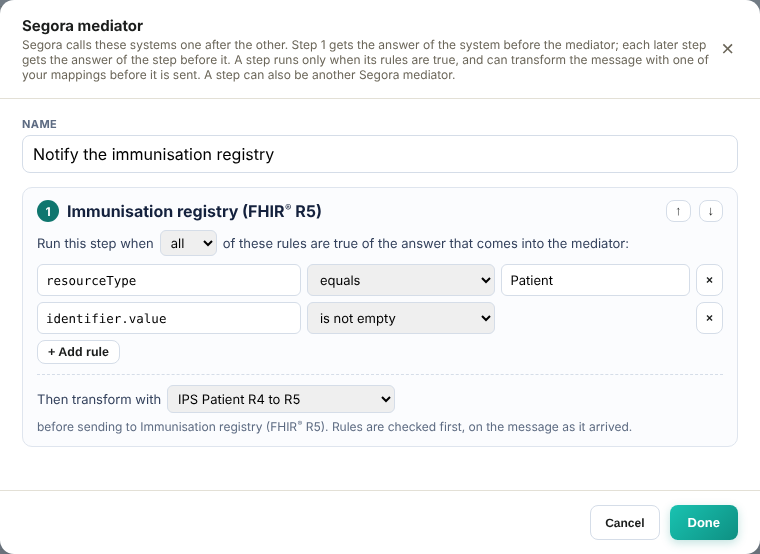
Steps and rules: the step runs only when the answer is a Patient with an identifier, then the mapping turns it into an R5 Patient. What it is
Checks and conversions on a system’s answer, in order: is this value there, does it match, then convert the format and send it on.
What it does not do
Combine answers from several systems, such as adding the business identifiers a client registry returns to the original message. Where you need that, Segora calls the system that does it as a target.
The mediator only sees what the system before it returns. As an orchestration (as here), the source still gets that system’s answer, and a read (GET) with a reverse transform works as usual; on the primary path, the source gets the mediator’s last answer instead, and reads are not available. A workflow uses either a pipeline or its own mediators, not both; mediators also work inside pipelines.
?Do you need a pipeline?
OptionalWhen several sources deliver to the same systems, build those systems once as a pipeline and connect each source to it. Change the pipeline once, and every workflow that uses it follows.
- Create the pipeline. It starts at an Entry: where a connected source’s message arrives.
- Say what the first system accepts: Legacy, FHIR® (R4 or R5) or OpenMRS.
- Add its systems, chains and orchestrations, as in a workflow.
- Connect each workflow’s source to the pipeline, and choose the pipeline on the mapping’s target structure.
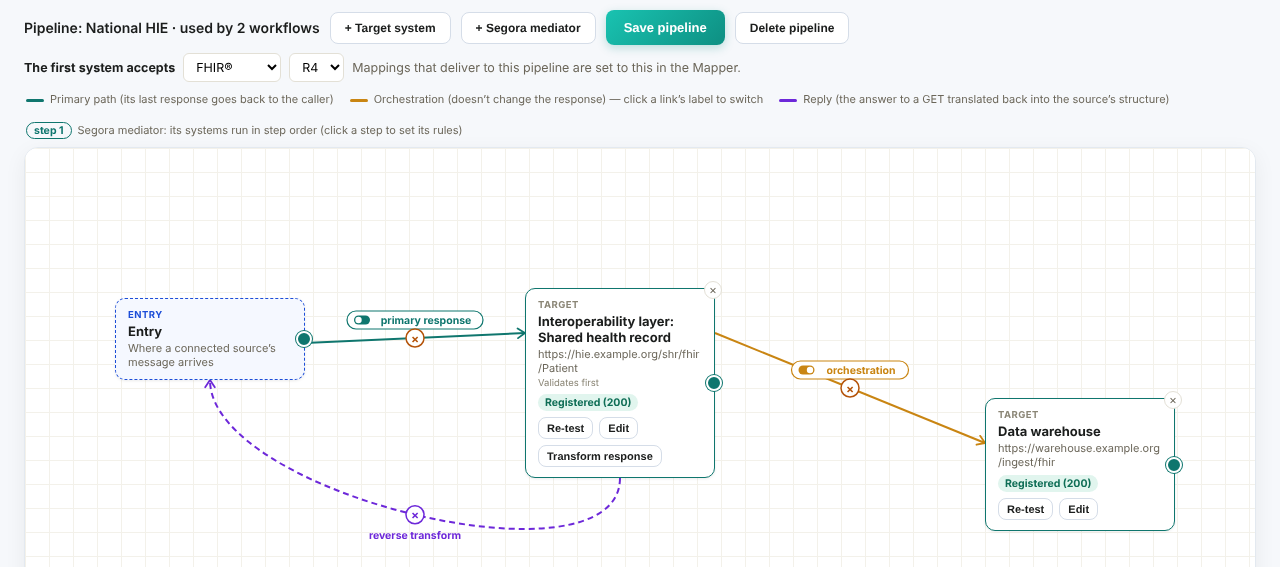
The same systems as a pipeline, built once: the Entry takes the source’s place. The reverse transform is set here, from the last system back to the Entry, so every source connected to the pipeline gets a GET’s answer back in its own structure. 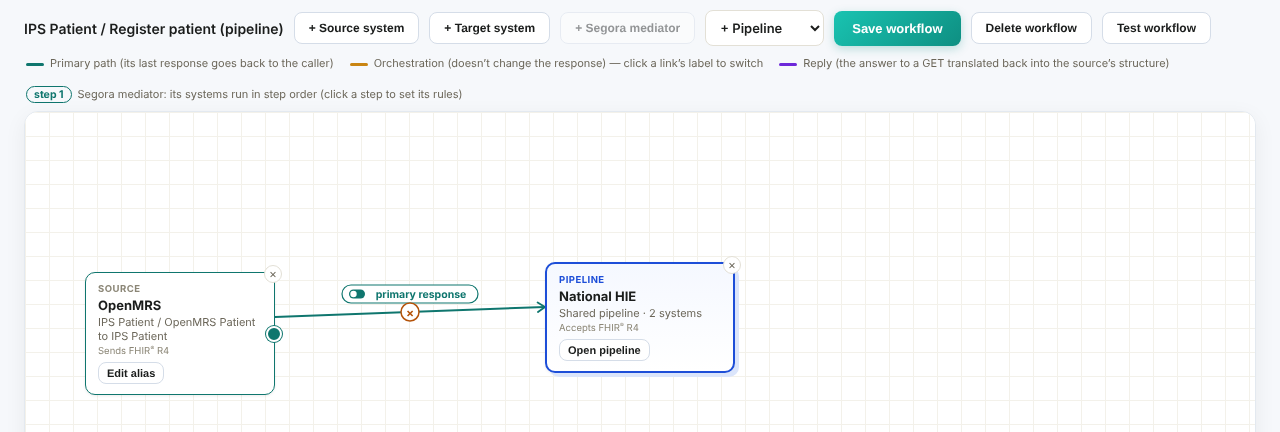
The workflow again, now connected to the pipeline: just the source and one pipeline block. The reverse transform comes from the pipeline, so none is drawn here. -
6Call the endpoints
Each workflow gets a web address that the sending system calls: POST to send, PUT to update a record, GET to read, DELETE to delete. One endpoint supports all four operations. Every address is listed with the systems it delivers to, and each can be tried straight away. The calling system signs in with an API key.
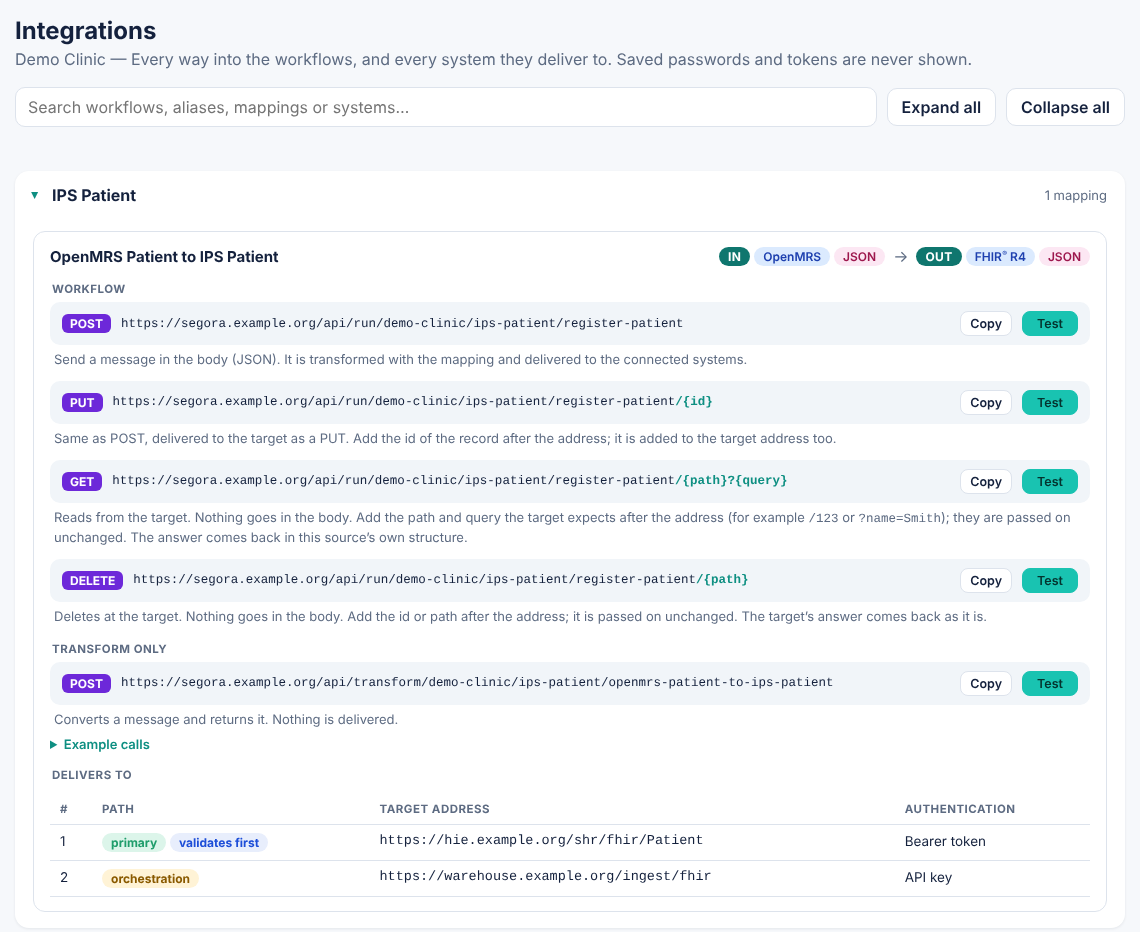
The addresses for the OpenMRS patient workflow, and the two systems it delivers to. A GET’s answer comes back in OpenMRS’s own structure. A source doesn’t have to wait to be sent messages: it can also fetch on a schedule from a system that can’t send them itself, and each record it finds runs through the workflow like a message sent in.
Every request, and every system it reached, is then recorded. Only details such as system names, status and timing are kept, never the message content.
Administrators can be emailed when an integration starts failing, and every saved change to a workflow, pipeline or mapping is kept in its History for 24 months (the latest version always), so you can see what was configured and restore an earlier version.
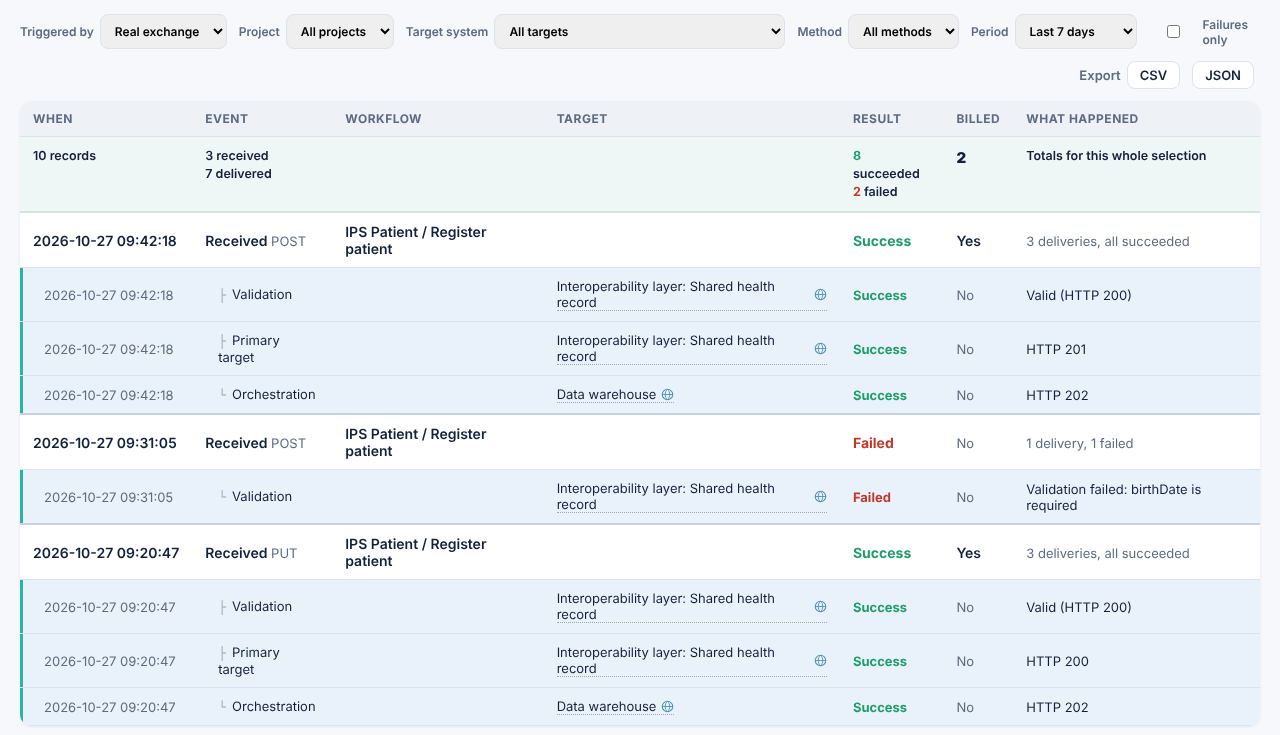
Three requests and what happened to each. The second failed validation, so nothing was delivered, and the data warehouse was not called. To see everything at once, open Ecosystem from the menu: every system your workflows reach, joined by the routes messages take between them, each coloured by how its deliveries are going: healthy, needs attention, failing, or no traffic. Click a system for its requests, deliveries, failures and success rate over a period you choose, from the last hour to the last 30 days, and the systems it sends to and receives from; click a route to light its whole path.
-
7Share the specification
You don’t write the documentation: Segora keeps a specification of every workflow, updated whenever the workflow, a pipeline it uses or one of its mappings is saved. Open Specifications from the menu and choose a project and a workflow, or all of them.
- Sequence diagram: every system the message reaches, in order, with validation, the mediator’s rules, orchestrations and the answer to the caller.
- For each mapping: its rules, what the source sends and what Segora sends on, and the value sets and code translations it uses.
- Data dictionary: for each mapping, every element it reads and writes: where it comes from, where it goes, how it is changed on the way, its description, data type, cardinality and value sets, and the values Segora sets itself. Download it as Excel or CSV.
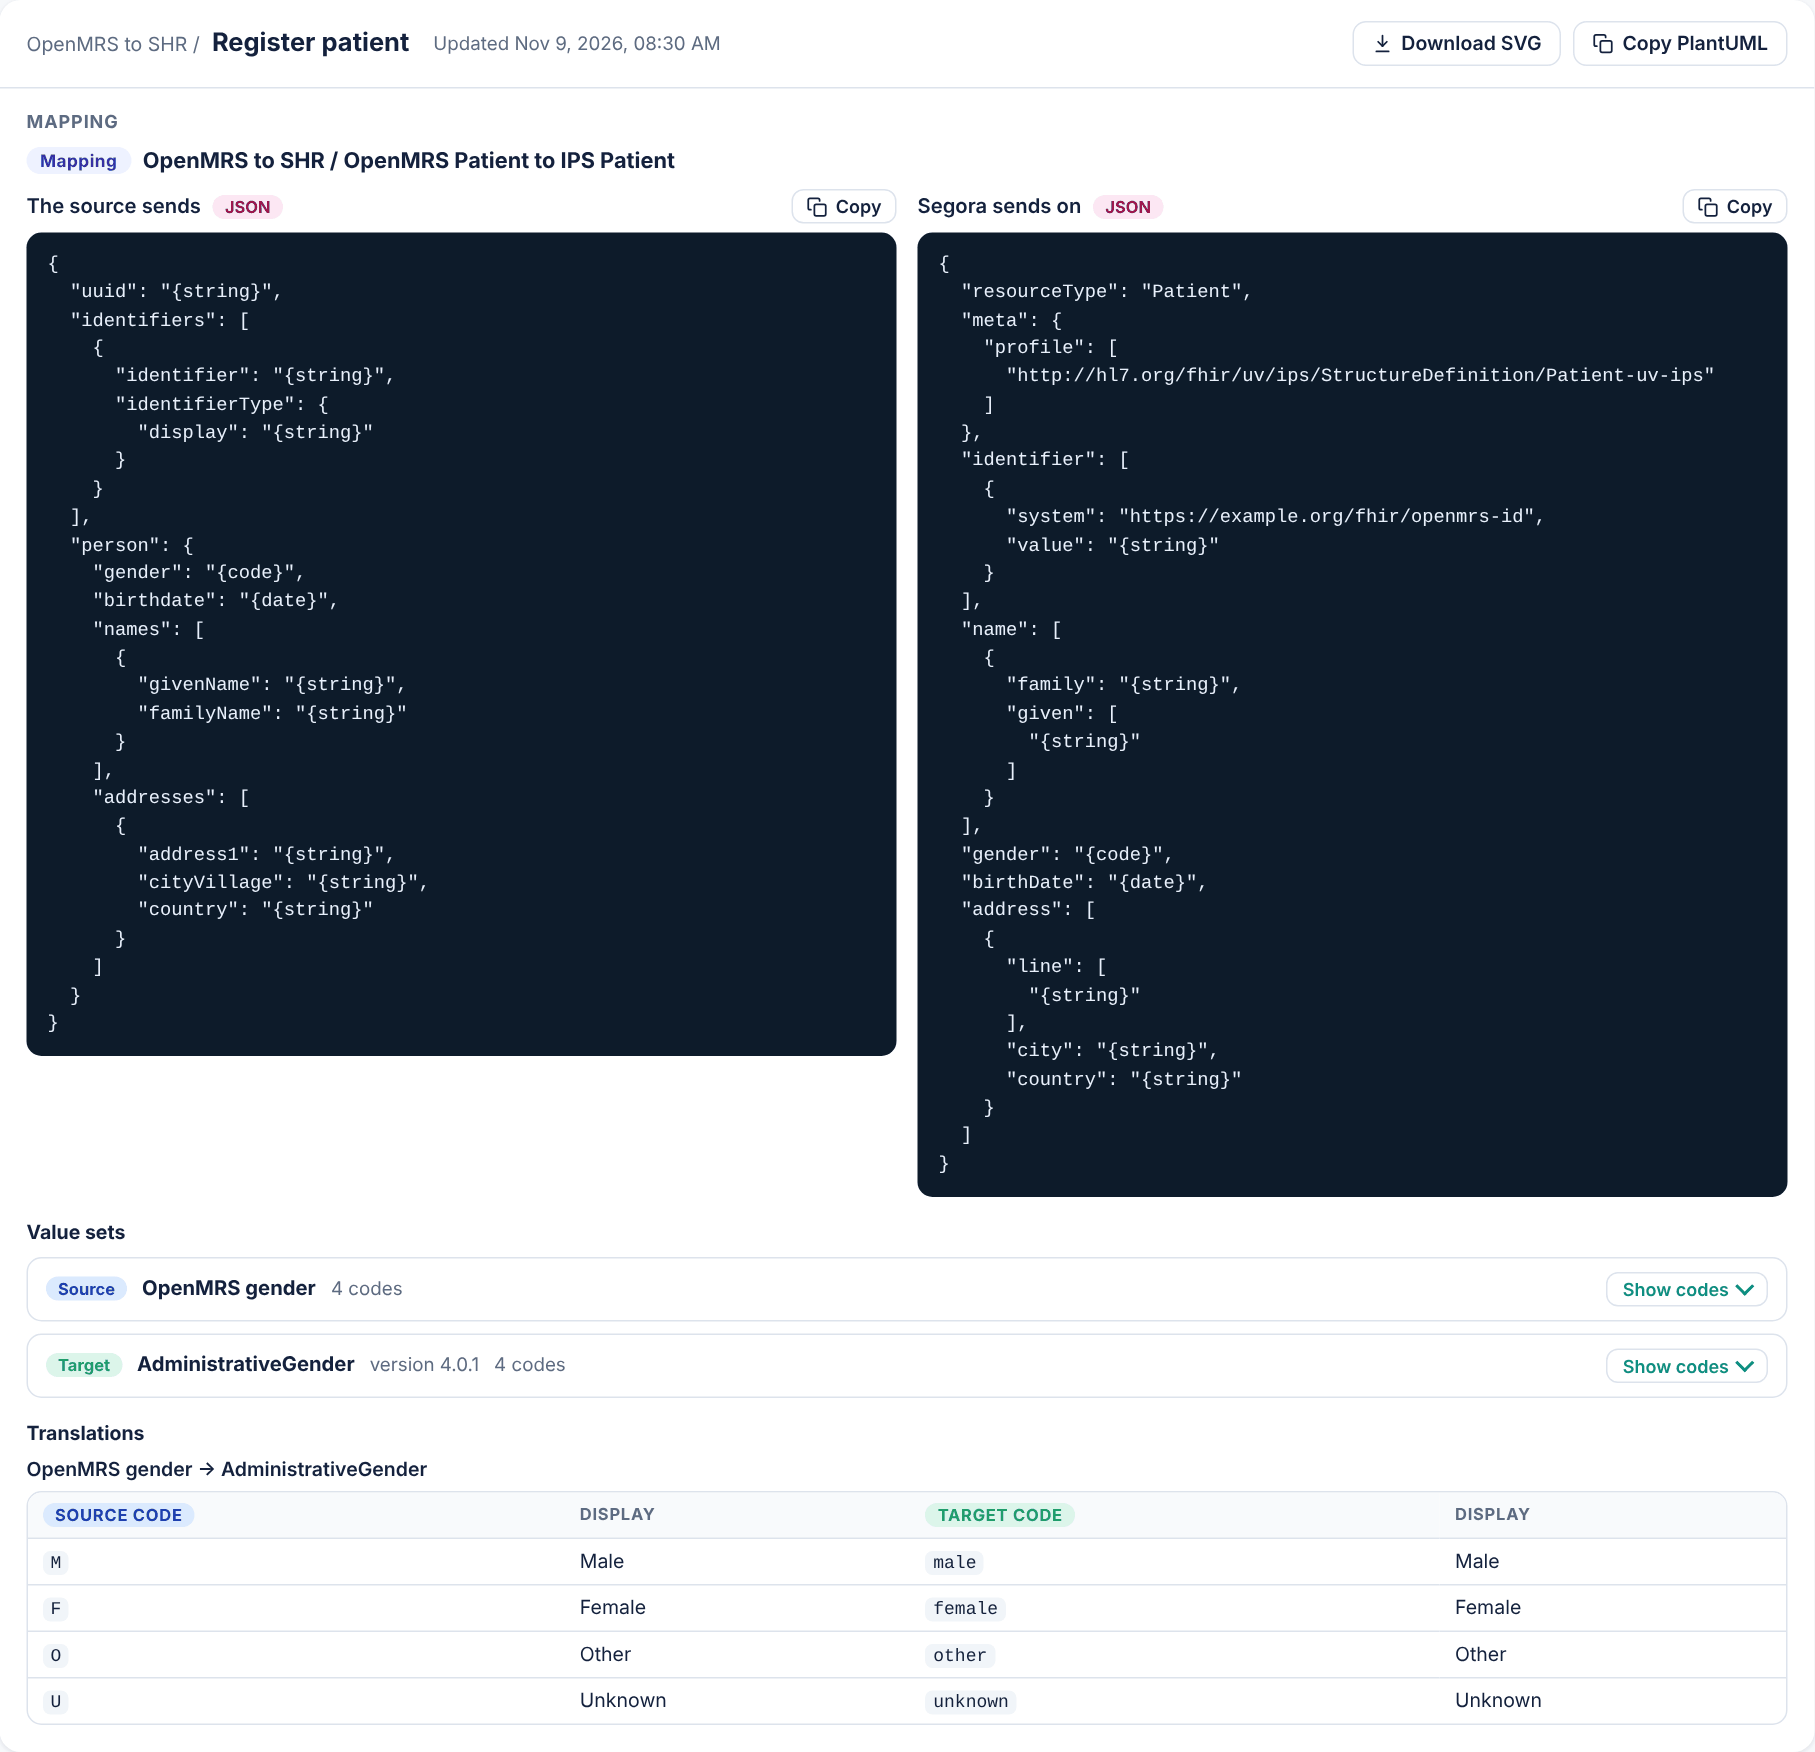
The Register patient workflow’s mapping in its specification: what OpenMRS sends and the IPS Patient Segora sends on, with each value shown by its type, then the value sets and how the gender codes are translated. 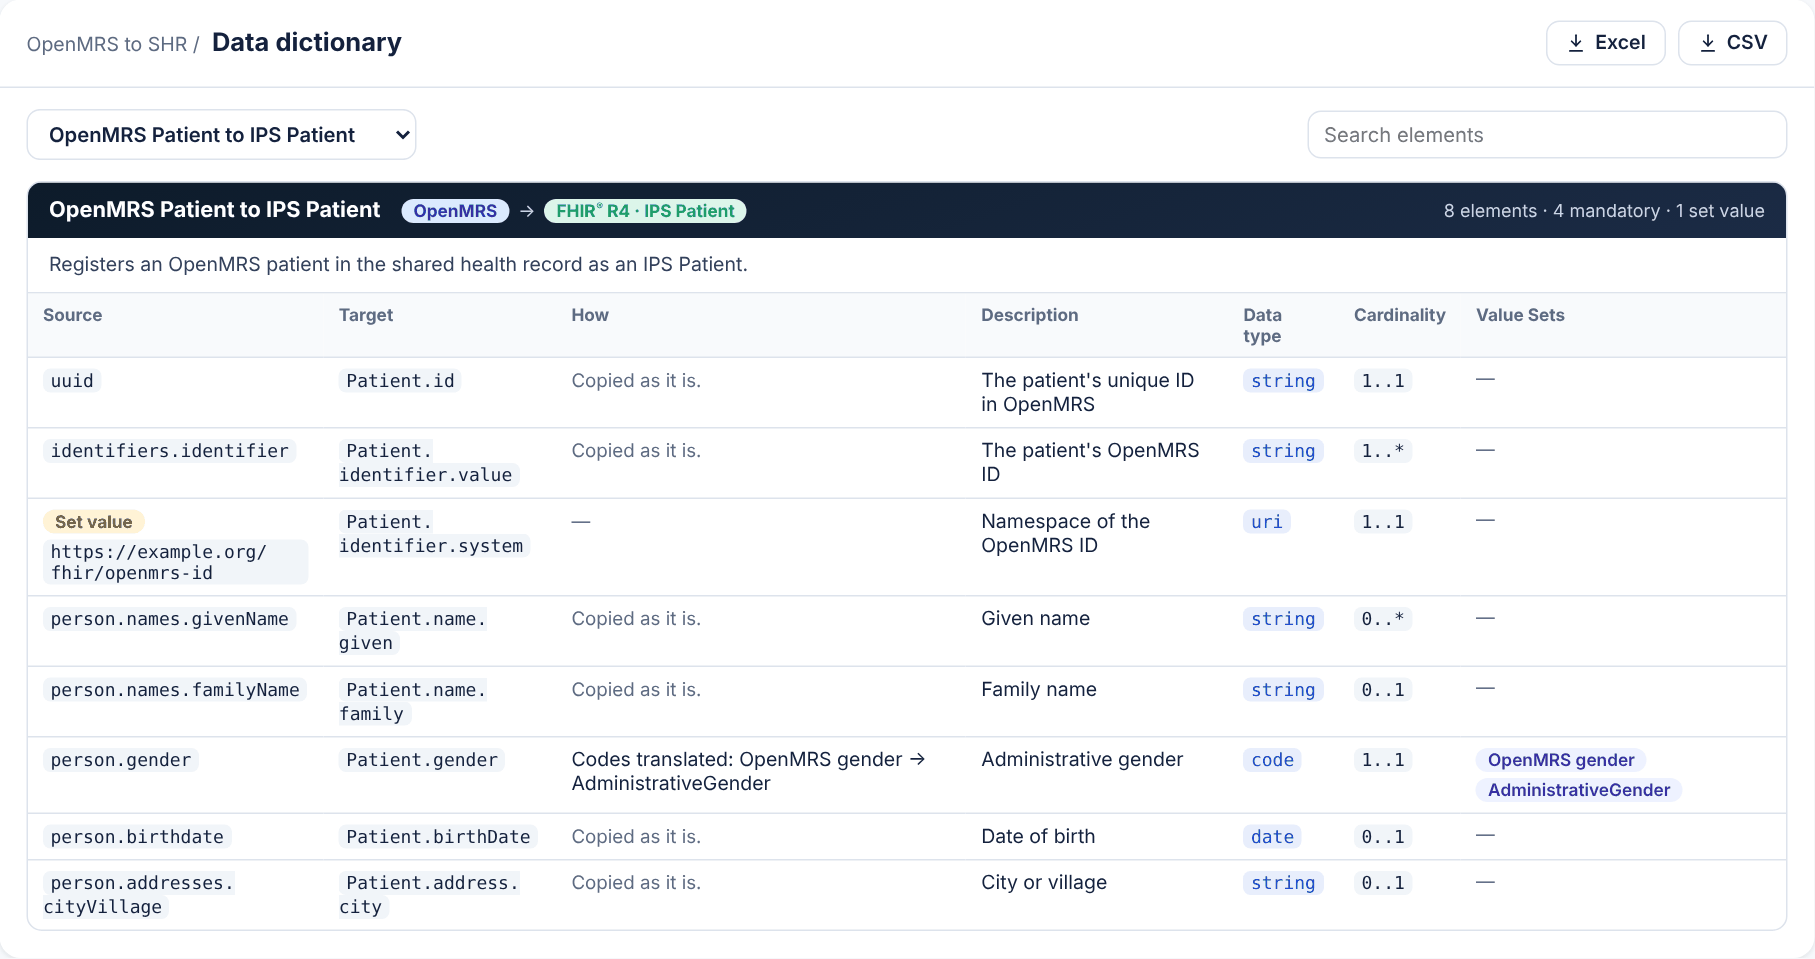
The data dictionary of the same mapping. The identifier’s namespace is a value Segora sets itself; gender is translated with the value sets above. Download it as a Word document to comment on and pass around, or print it or save it as a PDF. The example messages show each value’s type, such as {string} or {date}, never real data.
-
8Share it with the CommunitySupport
Have other implementers check your work. An organization’s administrators can publish a project’s mappings to the Segora Community with Publish to the Community on the project’s list of mappings. Implementers and subject-matter experts join as reviewers and:
- Review the mappings as a whole: Looks right, Needs changes or Has problems, with what they checked.
- Comment on, or suggest a change to, one link or one value set, where it is. You reply in the same thread.
- See every link, value set and code, and a Community sample if you add one: an example you paste or upload yourself and confirm holds no real person’s information.
The Community always shows the mappings as they are now: each save in Segora updates them there. Only the mappings and the shape of their structures are published, under CC BY 4.0. Your credentials, sign-in settings, the addresses of systems on your own network and the values of any sample message your structures were built from stay behind. Members can also open Discussions of their own, on any topic, apart from any publication.
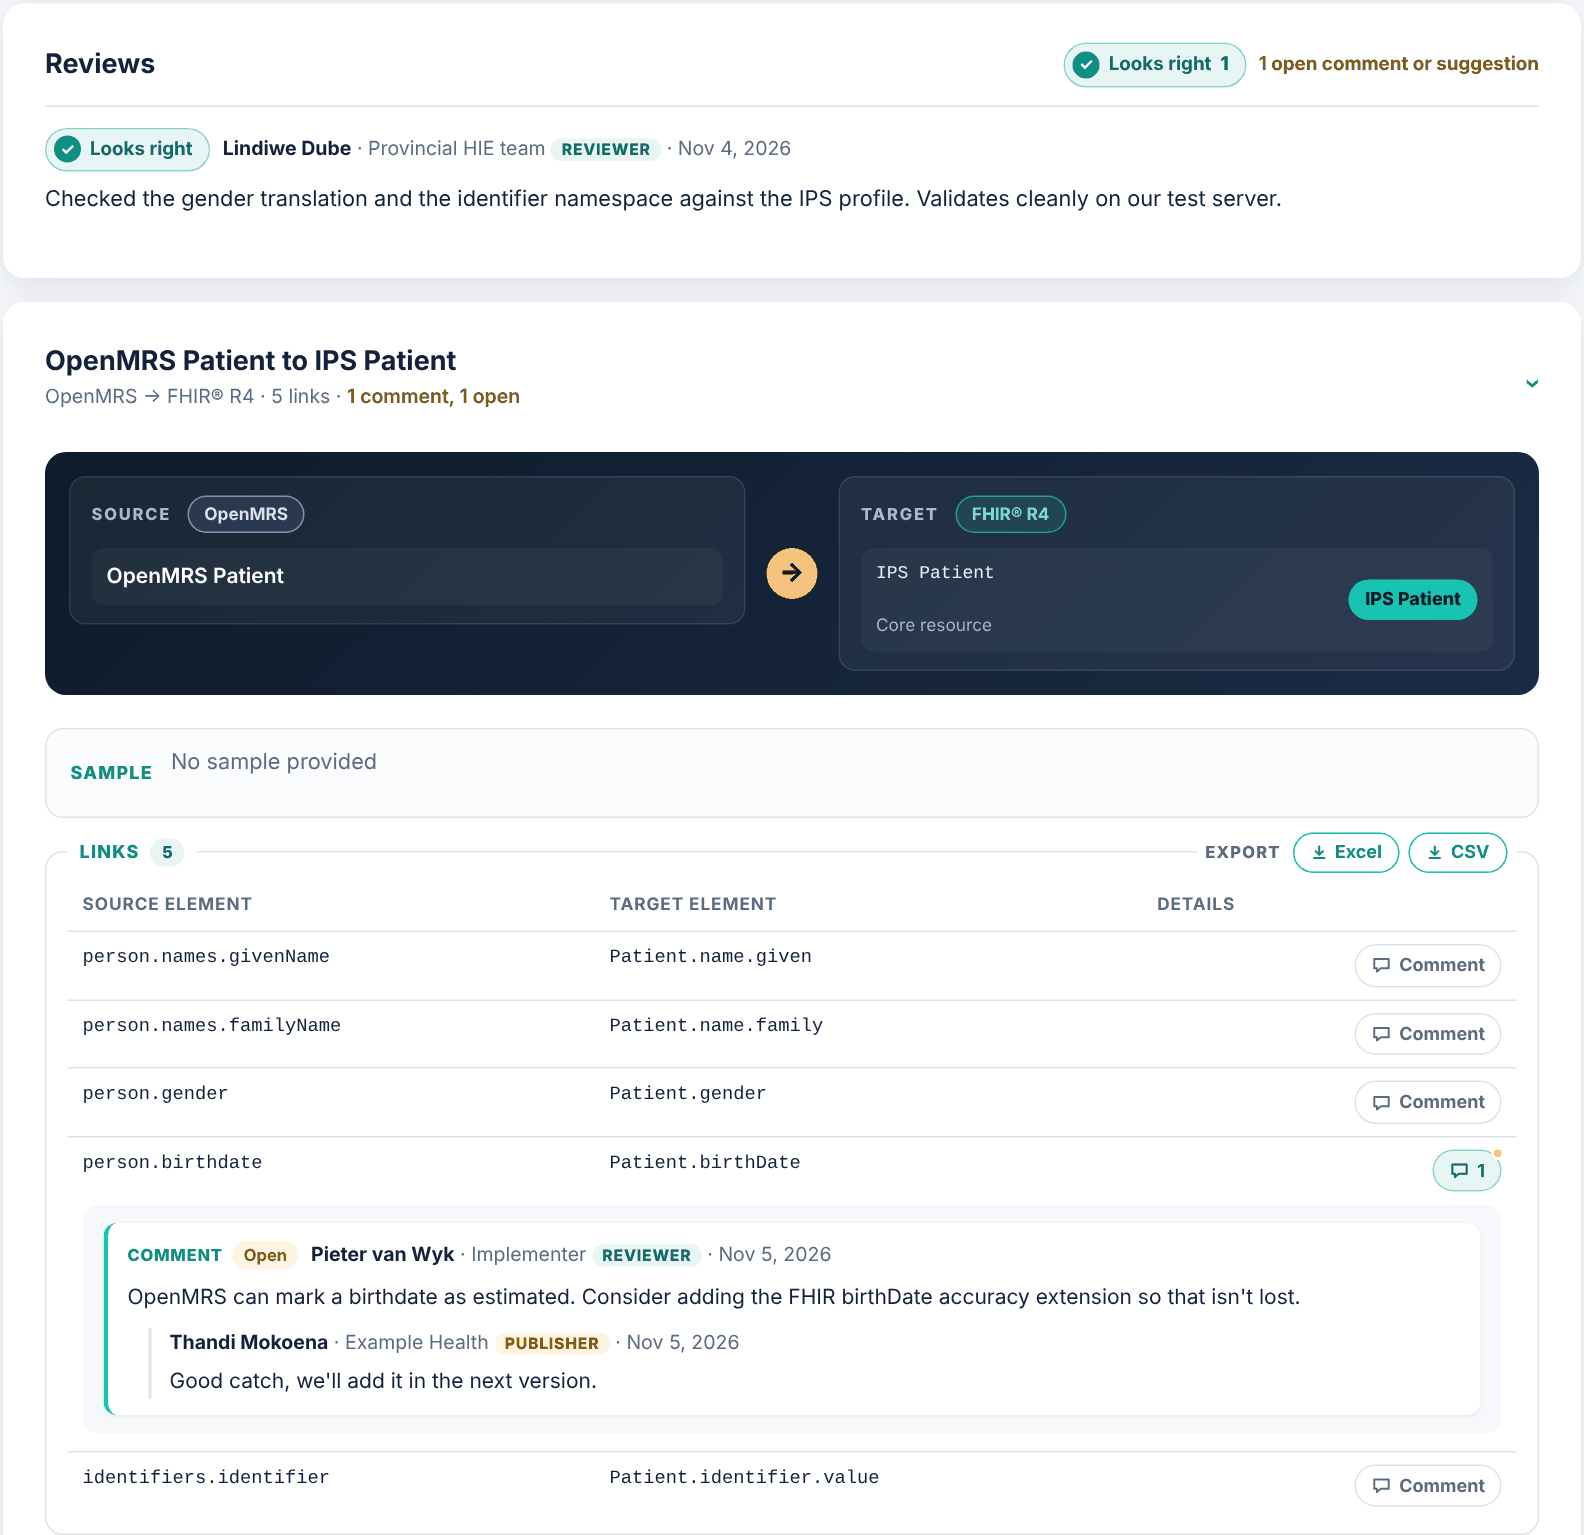
The OpenMRS patient mappings in the Community: a reviewer’s verdict, and a comment on one link with the publisher’s reply.